Recent Articles

Move-In Move-Out Inspections

Attention Landlords, Property Management Groups and Tenants!

Are you looking to make your move-in / Move-Out inspection process as smooth and stress-free as possible?

Contact us for your inspection today!

What Is a Move-In Inspection?

A move-in inspection is a walkthrough conducted by our independant inspectors to check for any damage beyond normal wear and tear in a rental property before someone moves in.

This critical step in the rental process serves to document the condition of the property before occupancy, safeguarding both the landlord’s investment as well as the tenant’s security deposit.

The components of a move-in inspection include examining the property exterior, interior, appliances, plumbing, and electrical systems for conditions that changed during occupancy.

The Importance of Move-In Inspections

Move-in inspections are important for all parties involved with a rental property.

For landlords, this helps document the condition of the rental property, preventing disputes over damages and ensuring the security deposit is used fairly. For tenants, move-in inspections provide an opportunity to identify pre-existing damage, ensuring they are not held responsible for any conditions that were already there.

Additionally, these inspections help establish expectations for the care of the property between landlords and tenants.

This is particularly useful for the move-out inspection. Inspection reports serve as a valuable point of reference to confirm whether damages or normal wear and tear occurred throughout the duration of the tenant’s occupancy.

Benefits for Landlords and Property Management Groups

Landlords and Property Management Groups's benefit from move-in inspections by having a professional inspection report of the property’s condition before tenants arrive. This inspection report serves as documentation that can help mitigate disputes over pre-exisiting damages and protect landlords from potential legal action.

Furthermore, move-in inspections allow landlords and Property Management Groups's to identify any repairs or maintenance that need to be addressed before the tenant moves in, ensuring the property remains in excellent condition throughout the lease term.

Benefits for Tenants

The move-in inspection provides the same protection to a new tenant. It helps tenants evaluate and record the condition of the property during the move-in process. It ensures that landlords and property managers keep the units in good condition, identify items that need to be repaired, and will help hold previous tenants accountable for any damage they caused while living in the space. The report may also serve as a written record if the property owner denies a tenant a security deposit return or if there’s a legal dispute in the future

What’s included in the move-in checklist?

The move-in inspection includes general information that applies to most types of properties but also items specific to the rental unit being leased.

Information about the tenant and property

General items

The condition of items found throughout the house or apartment, including:

  • doors, hardware, and locks
  • windows
  • window coverings and blinds
  • floors
  • ceilings
  • lighting
  • electrical outlets

Verify that fire alarms and smoke detectors are in working order.

Using move-in and move-out inspection reports can benefit your business in many ways. Make this a focus of your tenant journey and you will be well on your way to maintaining the topnotch tenant experience with your commercial property rentals.

All of our reports are compiled in your easy to use Client Dashboard. You'll have 24/7 access to all projects and inspections reports anytime you need them. Report can be viewed online in HTML format, shared with a private link as well as printed into a simple to use PDF file.

Like to learn more? See a sample report? Call us 425.608.9553


Foundation Anchors and Shear Wall Strapping

SHEAR WALL HOLD DOWNS & ANCHOR BOLTS

Traditional anchor bolts are still used to secure the 2×6 interior walls of this Kirkland home to the concrete floor. The mudsill anchor is installed at the time of the concrete foundation pour. Depending on the application, the foundation anchors are spaced 3 to 6 feet apart. One end of the bracket penetrates the wet concrete foundation at an angle. When the concrete hardens, the framing crew lays down the treated wood sill plate. Visible in the photo just below the sill plate is a layer of  1/4″ white foam. This is a sill seal that reduces airflow under the framed wall and makes the home more energy efficient and helps the home pass the required blower door testing. It also serves as a barrier to pests and insects entering the home and reduces moisture infiltration.

Another important structural fastener system is the shear wall strapping or hold downs. 

When the applied force at the top of the wall reaches a certain amount, the overturning moment will equal the resisting moment. Even the slightest additional applied force will cause the wall to turn over. Since we cannot allow walls to overturn, we must install anchors to hold them down to the structural elements below. The word "hold-down" (hyphenated or as one word) highlights the purpose. In some cases even where the overturning moment does not equal the resisting moment, hold-downs are required. Hold-downs can take many forms. Some look like straps that emerge from the foundation and nail to the edge or face of a stud. Others connect foundation bolts or threaded rods to the studs via bolts or nails. The hold-down creates a path for forces to travel out of a shear wall and into other portions of the building.,/div>

Multi Plex | Condo | Commercial - Reserve Study

Reserve Study Services

What is a reserve study?

Reserve studies are comprehensive reports that are used as budget planning tools that will assess the current financial health of the reserve fund as well as create a plan for future funding to offset anticipated major future common area expenditures.

According to the Community Association Institute's Best Practices, Reserve Studies/Management: “There are two components of a reserve study—a physical analysis and a financial analysis. During the physical analysis, a reserve provider evaluates information regarding the physical status and repair/replacement cost of the association’s major common area components. To do so, the provider conducts a component inventory, a condition assessment, and life and valuation estimates. A financial analysis assesses only the association’s reserve balance or fund status (measured in cash or as percent funded) to determine a recommendation for an appropriate reserve contribution rate (funding plan)."

What are the different types of reserve studies?

Reserve studies fit into one of three categories: Full; Update with Site Visit, and Update with No Site Visit. They are frequently called Level 1, Level 2, and Level 3 respectively (as defined by Washington State RCW 64.90.550).

Level 1:  A full reserve study – the reserve provider conducts a component inventory, a condition assessment (based upon on‐site visual observations), and life and valuation estimates to determine both a fund status and a funding plan. They typically extend 30 years. A full reserve study must be in place before a Level 2 or Level 3 can take place.

Level 2:  An update with site visit (on‐site review) ‐‐ the reserve study provider conducts a component inventory (verification only, not quantification), a condition assessment (based on on‐site visual observations), and life and valuation estimates to determine both a fund status and a funding plan. A Level 2 update is performed every third year, with the first one scheduled 3 years after Level 1 was completed.

Level 3: An update with no site visit (off‐site review) ‐‐ the reserve study provider conducts life and valuation estimates to determine a fund status and a funding plan. A Level 3 update is performed annually, except in years when a Level 1 or Level 2 has been conducted.

If you follow Washington State RCW 64.90.555 (which we recommend), your reserve study schedule would look like this:

Year 1: Level 1 full 30‐year study

Years 2, 3: Level 3 annual updates

Year 4: Level 2 update with a site visit

Years 5, 6: Level 3 annual updates

Year 7: Level 2 update with a site visit of Level 2 and Level 3 updates continues indefinitely. A Level 1 full study is not necessary after year 1.

Reserve Study reports are not just for Condos and Home Owner Associations! Commercial property management can greatly benefit from these styles of cost analyst reports!

Meth Testing Seattle | Bellevue | Kirkland | Redmond

Commercial & Residential Meth Testing

Bad news for Washington State! We have the highest standard in the entire United States of 1.5 µg/100 cm2. Why so high!!!

EPA does not intend this document to set, establish or promote quantitative cleanup standards. Many state and local authorities have established quantitative cleanup standards for meth and chemicals associated with its production. As of August 2021, 21 states require or recommend that meth labs be cleaned to meet certain quantitative meth remediation standards. Current state standards range from 0.05 µg/100 cm2 to 1.5 µg/100 cm2 . The most common standard is 0.1 µg/100 cm2 . Additionally, 11 states have process-based cleanup guidance materials, but no associated numerical remediation levels. Bear in mind that state and local requirements and guidelines change frequently.

Methamphetamine manufacturing is, unfortunately, a common occurrence, and Fentanyl, a synthetic opioid often manufactured to look like Oxycodone, is fast becoming a more common hazard. In 2020, Fentanyl overtook Methamphetamine as the drug most involved in overdoses in Washington state. 

Meth is made from common household items that are readily available at supermarkets and hardware stores. When these ingredients are mixed together or “cooked” to produce the drug, they generate a large amount of chemical waste. This waste is typically dumped down the drain but may be stored, buried, or dumped elsewhere on the property.

Contamination of residential homes with methamphetamine is an emerging issue of significant concern to public health. Cooking or smoking methamphetamine in a residential property contaminates the house, furnishings, and personal possessions within it, with subsequent exposure through ingestion, dermal absorption, and/or inhalation causing adverse health effects. 

Surfaces in the residence may become contaminated with this waste and be corrosive. If not properly decontaminated, residual wastes can remain on surfaces for years. This is why meth labs are considered hazardous and should only be handled by hazardous waste professionals.

Signs of a Former Meth Lab

  • Red or yellow stains on carpets, floors, and counters
  • Iodine stains found on walls
  • Windows that have been blocked out
  • Burns on surfaces
  • Empty cylinders
  • Empty jars
  • Corroded canisters
  • Ephedrine blister packs
  • Tubes
  • Rock salt
  • Hydrochloric acid or ammonia
  • Hydrogen peroxide
  • Batteries
  • Coffee filters containing a reddish stain
  • The strong smell of cat urine, vinegar, or ammonia

Do you need a Meth test when buying a new home?

HVAC contractors are rated the highest users in the construction industry for Meth use! Testing new homes is the only way to show a home is not contaminated. So YES every home needs testing. 

Own Business downtown Seattle? The homeless find all kinds of ways to use meth in their business bathrooms. Drug use seems like an open policy nowadays in Seattle. Drug use is way up in Washington. On any given day users can be seen on every street corner doing drugs.

An audit showed the drug is involved in 74% of overdose deaths for people experiencing homelessness.

Meth overdose deaths are increasing year after year.

King County reported 98 meth-involved deaths in 2016. That increased to 365 deaths in 2021.

For Meth Testing in Washington State call 425.608.9553


Trigger your Additional Inspection Period on Form R35

Washington REALTORS® Legal Hotline Lawyer Annie Fitzsimmons filmed a special supplemental series to “Inspection Week“. In this series, Annie digs a little deeper into Form 35R – Inspection Contingency as a negotiation tool and how to use it most effectively.

This first video in the series covers a topic that many brokers want clarification on…counting dates, or the Computation of Time. They review counting dates for the initial inspection period, the additional inspection period, Form 35R request for repairs…and more.


Our inspection reports include this simple verbiage to allow Broker access for an additional inspection time if allowed by terms of the R35 Form set by the seller.

If the home inspection report shows that there are several hundred dollars (or even a couple of thousand dollars) in repairs needed, it is not necessarily wise to demand that the seller fix those items.  Of course, you could also demand that the seller does a price reduction, but that may not be wise either.  What buyers often don’t realize is that they may already have pushed the seller as far as the seller is emotionally or psychologically willing to go.  The seller feels he took a whipping when he reluctantly agreed to the buyer’s counteroffer to his counteroffer, and the seller often feels they sold for far less than they wanted.  At this stage of the transaction, the seller is often feeling that their back is up against the wall, and they are very defensive when it comes to any more demands.  If the buyer demands the seller fix something for a few hundred dollars, the seller is often offended and many sellers have told their real estate agent, “I’ll be darned if the buyer is going to nickel and dime me to death! We already came down $20,000 on price. ”

Buyers and sellers can walk away from the transaction over a few hundred dollars because it was a “matter of principle” for both parties.  Do not let your dream home turn into a loss of over a few hundred dollars (or even a few thousand dollars) when you already negotiated the price down by tens of thousands of dollars.  Handling the Home Inspection and the Form 35R Inspection Response is one of the last but most important steps in your due diligence.


Are you a Washington State Broker? Make sure you have us listed on your 41D form!
 
 
Form 35 REVISIONS 2023


Preparing for a pre listing Inspection

What should I do before a home inspection?

Aside from hiring an inspector and showing up at the property on time, sellers don’t have to do anything special to get ready for the inspection. On the other hand, there are quite a few things a seller can and should do to facilitate the home inspection. 

Mold Attic IssueSome major things include:

  • Cleaning the house. A spotless house is not only easier to navigate but also leaves a great impression on potential buyers and prevents unexpected problems. The last thing you want is for a deal to fall through because the buyer thinks you haven’t been cleaning the house regularly.
  • Leaving the utilities connected. Certified home inspectors leave no rock unturned. They will run the dishwasher, turn on the stove, test the air conditioning and the furnace, and more. If these utilities are disconnected, the inspector may be forced to reschedule. 
  • Declutter. Remove items that may make it difficult to navigate the house or limit access to the furnace, water heater, or air conditioner. The inspector will need 3-4 feet of working space in order to examine these items, so keep that in mind while decluttering. 
  • Make sure all lighting has good working bulbs
  • Clear access to Electrical Panel, crawlspace, and Furnace
  • Owner belongings are protected from attic access debris
  • Provide paperwork for any service or repairs

Does the seller have to disclose the previous inspections?

Federal law requires sellers to disclose the presence of any known lead-based paints in the home, provide the buyer with an EPA-published pamphlet on lead-based paint, and get and keep a signed statement from the buyer saying that these disclosure requirements were completed.

Aside from that, there are no nationwide laws on what exactly the seller is required to disclose. Since every state has its own regulations, your best course of action is to consult your home inspection company of choice. 

Common disclosures include:

  • Mold infestations and water damage. In addition to being upfront about crawlspace floods or leaks in the roof, the seller must also notify the buyer about what (if anything) was done to remedy these problems. 
  • Pest infestations. The presence of rats, cockroaches, and especially termites and carpenter ants can be a serious problem and needs to be disclosed. As with water damage, the buyers also have to be told about any measures that were taken to remedy the issue.
  • Insurance claims and major repairs are other things the buyers need to know about. This includes repairs performed by previous owners. 

Noise Ordinance Testing Survey - Commercial Residential Office Classroom

Noise Level

The nighttime noise level of 45 dBA is similar to bird calls. Manufacturer specifications for mechanical equipment typically includes decibel ratings. For example, heat pumps and air conditioners are tested to a standard that gives them a manufacturer’s sound power rating usually in the 70–80 dBA range. This would require the mechanical equipment to be placed from 40 to 100 feet from the property line to meet maximum nighttime noise levels.

Care must be taken to locate noise-producing mechanical equipment—such as heat pumps, air conditioners, and generators—so the noise produced during its operation is not excessive for neighboring properties. The city has maximum sound levels which must be met at each property line. These apply to equipment located on the roof, on the ground, outside the building, at an exterior wall, and inside a building where noise may be transmitted to an exterior wall through a duct and/or louver. Most noise problems occur between mid-evening and sunrise when ambient sound levels in the neighborhood are low due to less outdoor activity and traffic.

Noise Sources Identification

PNWIG Accurately identifies and categorizes noise sources in real-time and uses Class 1 meters

Our Sound Al excels in noise sources identification, using advanced machine learning algorithms to analyze recorded audio data. It can classify sound sources into 28 distinct categories, such as industrial noise, traffic, construction, wildlife and enviromental sounds. This precise identification pinpoints noise levels produced by your HVAC system isolating out other enviromental noise.

Code Requirements

The City of Bellevue

The noise ordinance is located in Bellevue City Code Title 9.18, Noise Control. It restricts the noise level at the property line in residential zoning districts to 45 dBA at night (10 p.m. to 7 a.m.) and 55 dBA during the day.

Land Use Code Section 20.20.525 requires an owner to build a new single-family home or add more than 1,000 square feet to an existing home to locate mechanical equipment in the rear yard, placed no less than five feet from any property line.

Other mechanical equipment (not a new home, not adding more than 1,000 square feet to an existing home) placed in the side yard outside of the minimum side-structure setback must include sound screening to reduce noise impacts.

City of Seattle

Seattle Municipal Code 25.08.410 regarding exterior sound level limits, states A. The exterior sound level limits are based on the Leq during the measurement interval using a minimum measurement interval of one minute for a constant sound source, or a one‐hour measurement for a non‐continuous sound source. For sound sources located within the City, the exterior sound level limits are as follows:

District of Sound Source

Residential Commercial Industrial

District of Receiving Property

Residential (dB(A)) (Leq)

55 57 60

Commercial (dB(A)) (Leq)

57 60 65

Industrial (dB(A)) (Leq)

60 65 70

Seattle Municipal Code 25.08.420 regarding night-time noise limits, states A. Between the hours of 10 p.m. and 7 a.m. during weekdays, and between the hours of 10 p.m. and 9 a.m. on weekends and legal holidays, the exterior sound level limits established by Section 25.08.410 are reduced by 10 dB(A) where the receiving property lies within a residential district of the City.

Contact us for a noise survey meeting City Code.


School Classroom Surveys


WAC 246-366-110

Sound control.

(1) In new construction, plans submitted under WAC  246-366-040 shall specify ventilation equipment and other mechanical noise sources in classrooms are designed to provide background sound which conforms to a noise criterion curve or equivalent not to exceed NC-35. The owner shall certify equipment and features are installed according to the approved plans.

(2) In new construction, the actual background noise at any student location within the classroom shall not exceed 45 dBA (Legx) and 70 dB (Leqx) (unweighted scale) where x is thirty seconds or more. The health officer shall determine compliance with this section when the ventilation system and the ventilation system's noise generating components, e.g., condenser, heat pump, etc., are in operation.

(3) Existing portable classrooms, constructed before January 1, 1990, moved from one site to another on the same school property or within the same school district are exempt from the requirements of this section if the portable classrooms meet the following:

(a) Noise abating or noise generating features shall not be altered in a manner that may increase noise levels;

(b) The portable classrooms were previously in use for general instruction;

(c) Ownership of the portable classrooms will remain the same; and

(d) The new site is in compliance with WAC  246-366-030(3).

(4) In new construction, the maximum ambient noise level in industrial arts, vocational agriculture and trade, and industrial classrooms shall not exceed 65 dBA when all fume and dust exhaust systems are operating.

(5) The maximum noise exposure for students in vocational education and music areas shall not exceed the levels specified in Table 1.

TABLE 1

MAXIMUM NOISE EXPOSURES PERMISSIBLE

Duration per day

(hours)


Sound Level

(dBA)

8


hours


85


6


hours


87


4


hours


90


3


hours


92


2


hours


95


1-1/2


hours


97


1


hour


100


1/2


hour


105


1/4


hour


110


Students shall not be exposed to sound levels equal to or greater than 115 dBA.

(6) Should the total noise exposure in vocational education and music areas exceed the levels specified in Table 1 of subsection (5) of this section, hearing protectors, e.g., ear plugs, muffs, etc., shall be provided to and used by the exposed students. Hearing protectors shall reduce student noise exposure to comply with the levels specified in Table 1 of subsection (5) of this section.


WAC 173-60-040

Maximum permissible environmental noise levels.

(1) No person shall cause or permit noise to intrude into the property of another person which noise exceeds the maximum permissible noise levels set forth below in this section.

(2)(a) The noise limitations established are as set forth in the following table after any applicable adjustments provided for herein are applied.


Class A

Class B

Class C

class a

55 dBA

57 dBA

60 dBA

class b

57

60

65

class c

60

65

70

(b) Between the hours of 10:00 p.m. and 7:00 a.m. the noise limitations of the foregoing table shall be reduced by 10 dBA for receiving property within Class A EDNAs.

(c) At any hour of the day or night the applicable noise limitations in (a) and (b) above may be exceeded for any receiving property by no more than:

(i) 5 dBA for a total of 15 minutes in any one-hour period; or

(ii) 10 dBA for a total of 5 minutes in any one-hour period; or

(iii) 15 dBA for a total of 1.5 minutes in any one-hour period.


Contact us for a Class 1 Sound Survey. Only the Best.

  • Environmental noise
  • City noise
  • Environmental impact studies
  • Construction noise
  • Monitoring noisy venues

CESCL Stormwater Monitoring Inspections

CESCL certification is required by the Washington State Department of Ecology, Construction Stormwater General Permit for personnel responsible for monitoring stormwater at construction sites disturbing one or more acres of land, or are part of a larger common plan of development. Our inspectors are BMP C160 certified.

Call us for a CESCL site inspection

Termites in Bellevue,WA

Ready to swarm.


Your Smoke Detector May Just KILL YOU !!!

 WA Laws/Rules Regarding Smoke Detectors and Carbon Monoxide Detectors

This article explains what the Washington home inspector Standards of Practice have to say (or not say) about smoke detectors and carbon monoxide detectors, and highlights what some of the requirements are about each for real estate transactions (which have nothing to do with inspectors). In the end, we include links that may be important to you. By reading this material and checking the links, you will know what is included and not included in the inspection process and what is required during real estate transactions. 

Washington’s SOP does not mention carbon monoxide detectors at all, and the only place where smoke detectors are mentioned (WAC 308-408C-110) it states that “the inspector is not required to inspect ancillary systems including but not limited to smoke/heat detectors”.


Watch This Video BEFORE you do anything else.

Smoke alarms save lives, but only if they’re working properly. Test monthly!


Where to Place Smoke Alarms

The placement of smoke detectors depends on the layout of the room, the HVAC systems, and the size of your home. At the very least, you should install one detector on each floor, one near the kitchen (but not over the stove), and one in each sleeping area. That’s the bare minimum. Err on the safe side and place an alarm in each and every bedroom, even in the hallway outside each bedroom, one adjacent to the kitchen, near fireplaces, and in other strategic areas of your home, depending on its size. Always follow manufacturer installation recommendations.

Take a look at Amazon's Dual Sensor Alarm - Top Choice:


Test Your Smoke Detectors

Your alarms are pretty self-sufficient, but you should do regular testing and seasonal battery refreshes. I like to test my smoke alarms about once a month, typically in conjunction with another sporadic chore, like window washing. (Blech.) You should also swap out old batteries for new ones at least once a year. At our house, we do it twice a year, whenever we’re turning our clocks back/forward for Daylight Saving’s, and use a smoke spray to properly test every unit. The test buttons only test power to the unit. 

One manufacturer, the Pittway Corporation, which makes about 70 percent of the detectors sold in the United States, recommends that a detector be discarded after 10 years. But the Black & Decker Corporation, another leading producer, makes no recommendation.


What? CLEANING YOUR ALARM? YES - YOUR ALARM SHOULD BE CLEANED AT LEAST ONCE A YEAR

To clean your alarm, remove it from the mounting bracket as outlined at the beginning of this section. You can clean the interior of your alarm (sensing chamber) by using compressed air or a vacuum cleaner hose and blowing or vacuuming through the openings around the perimeter of the alarm. The outside of the alarm can be wiped with a damp cloth. After cleaning, reinstall your alarm and test the alarm by using the test button. If cleaning does not restore the alarm to normal operation the alarm should be replaced.

Keep your family safe by also installing CO alarms near ALL the bedrooms

Carbon monoxide alarms help save lives every day. Learn what they do, how to install them, and where you should place CO detectors.

What is carbon monoxide?

Carbon monoxide is known as the “silent killer” because it is odorless, tasteless, and colorless. It’s also toxic since the gas can prevent your body from properly transporting oxygen. If inhaled in high concentrations, carbon monoxide poisoning can happen quickly; it can also occur slowly if toxic gas levels build up slowly over time. Just as dangerous as a fire!

What are the symptoms of carbon monoxide poisoning?

People who have been exposed to carbon monoxide experience a range of symptoms that may include headaches, confusion, drowsiness, dizziness, burning eyes, and loss of consciousness. An acute case can result in brain damage and death. Note that children, seniors, and people who have pre-existing respiratory or heart conditions are often more sensitive to the effects of carbon monoxide. alarms are cheap so Install them!!!

What are possible sources of carbon monoxide in my home?

Carbon monoxide is a natural by-product of many home appliances. If you use charcoal, gasoline, kerosene, wood, propane, natural gas, or heating oil to create energy or heat – hot water heaters, grills, furnaces, fireplaces, stoves, room heaters, etc. – then there is potential for carbon monoxide in your home. It’s important to have these products installed by a professional, since proper installation, ventilation, and maintenance will reroute any carbon monoxide emissions out of your home to keep your family safe.

Carbon monoxide is a toxic gas known as the “silent killer” 

What are carbon monoxide alarms?

Carbon monoxide detectors, also known as CO alarms, function similarly to smoke alarms. If carbon monoxide levels are present in your home, the detector will emit a sharp beeping sound to alert you to the danger. Like smoke alarms, it is important to change your CO detector batteries regularly; I like to schedule new batteries for Daylight Savings time change since they make it easy to remember this twice-yearly swap.

How do I install a carbon monoxide alarm?

Heat and smoke rise, which is why we place smoke alarms high on the wall or ceiling. Carbon monoxide, however, mixes with the air. For this reason, it is preferable to install CO alarms at knee level – the approximate height of a sleeping person’s nose and mouth. This is why combo detectors are not the best choice!!!

If you have young children or pets that could tamper (play) with your detectors, you can move them up to chest height. Another option is to place them in a hard-to-reach area, where even curious hands and overzealous tails would have a hard time reaching. Bear in mind that a CO detector should never be blocked by furniture, curtains, or other objects, as restricted airflow can affect its function. Testing monthly should also be on your to-do list.

A single-function carbon monoxide alarm is recommended, but if you are installing a dual smoke-CO detector ( Because You Selling your Home?!), place it on the ceiling so it can detect smoke.

Carbon monoxide detectors should be strategically placed around your home as should smoke detectors.

Where should I place carbon monoxide detectors in my home?

Since we are most vulnerable to the effects of carbon monoxide poisoning while we sleep, it is important to place alarms near all your family’s bedrooms. If you only have one CO alarm (BUY MORE), place it as close to everyone’s sleeping area as possible.

Ideally, you should have carbon monoxide detectors placed throughout your home, as you do smoke alarms. You should place a CO detector in each major area of your home: in the kitchen, in your living/dining room, in your bedrooms, and the office. If you have children or elderly family members living with you, provide extra protection near their rooms. If you live in a multi-story home, be sure to place at least one carbon monoxide detector on each level.

If your furnace is located in the basement, be sure to place a CO detector there, as well. Likewise, if you have a gas clothes dryer, put an alarm in the laundry room. Place one in the garage, if you park your cars there. Wherever you have a solid fuel-fired appliance – anything that could produce carbon monoxide – you should also have a CO alarm.


Washington State LAW:

29-3-16a. Smoke detectors in one-and two-family dwellings: ...in residential units; penalty. (a) On or before the first day of July, one thousand nine hundred ninety-one, an operational smoke detector shall be installed in the immediate vicinity of each sleeping area within all one- and two-family dwellings, including any “manufactured home” as that term, is defined in subsection (j), section two, article nine, chapter twenty-one of this code.

The smoke detector shall be capable of sensing visible or invisible particles of combustion and shall meet the specifications and be installed as provided in the National Fire Protection Association Standard 72, “Standard for the Installation, Maintenance, and Use of Household Fire Warning Equipment”, 1996 edition, and in the manufacturer’s specifications. When activated, the smoke detector shall provide an alarm suitable to warn the occupants of the danger of fire.

(b) The owner of each dwelling described in subsection (a) of this section shall provide, install and replace the operational smoke detectors required by this section. So as to assure that the smoke detector continues to be operational, in each dwelling described in subsection (a) of this section which is not occupied by the owner thereof, the tenant in any dwelling shall perform routine maintenance on the smoke detectors within the dwelling.


Now you know, the rest is up to you to protect your family.


Window Wells

Requirements of Window Wells

 The IRC 2000 Egress Code which requires every home with a full basement to install window wells. The details of the Egress code for one and two families are as follows:

International Residential Code (IRC) 2000
Egress code for one and two families:

Definition of egress as described in IRC 2000 (Section R310) as it pertains to windows below ground level:

Window Wells/Area Wells:
Required where window opening sill height is below ground elevation.
Horizontal dimensions: = 9 sq.ft. (width x projection)
Horizontal projection: = 36 "

Windows:
Sill height of window above floor: Not to exceed 44"
Minimum opening area: = 5.7 sq. ft.
Minimum opening height = 24"
Minimum opening width: = 20"

Ladders:
Required on window wells deeper than 44" and must be permanently attached.
Ladder may encroach into well up to 6".
Step distance between rungs: = 18"
Rungs:12" wide or greater and must project a minimum of 3" away from wall but maximum of 6".

Though the IRC 2000 Egress Code was formed for the general safety of home owners. It is important to install a window well cover to safeguard the window wells from unwanted entry and to prevent falling accidents. But in order for a window well cover to be effective, home owners should take note of some of the qualities or characteristics of a good window well cover.

A good window well cover should be rust-resistant. This is an important feature since rust might be a sign for decay or weakening of a window well's durability. Also window wells should be able to hold great amounts of weight since children may from time to time step on it. Hi grade window well covers do not bend nor break easily (for transparent covers). And lastly, a window well cover should fit perfectly on youre window well opening, this is why choosing a custom made well cover is always an advantage over a pre-buit cover.

Wood Rot: The Inconspicuous Threat

Wood rot is not always easy to spot, yet it's (potentially) one of the most destructive threats to the well-being of a home.

Wood rot refers to decay caused by wood-hungry fungi and can be classified into two broad categories: Wet rot and dry rot. Both require moisture in order to develop, and although dry rot requires LESS moisture, the term "dry rot" is really a misnomer. The important thing for homeowners to understand is that wherever moisture meets wood is where rot can take hold. And if not remedied, wood rot (particularly the dry rot variety) can continue to spread, causing significant damage to the home and even its structure.

Here in the damp climate of the Pacific Northwest, exterior rot issues are fairly commonplace. But the sources of moisture leading to rot can be found both outside AND inside the house. On the exterior, damaged siding or roofing can allow rain to penetrate through to the underlying wood. Water can pool up in areas where vertical and horizontal surfaces meet, such as a deck next to an exterior wall. Failing caulking can allow water to seep behind window and door frames. On the interior side, a leaking pipe or damaged seal can lead to moisture under the floor or behind a wall. Even damp air combined with poor ventilation can create an environment conducive to the formation of wood rot.

Signs that indicate the possible presence of rot:

  • •Wood has become darker, has cracked, and/or is shrinking.
  • •Wood has become so soft that you can easily penetrate it with a screwdriver, or possibly even your finger.
  • •Growth resembling mushrooms, cobwebs, or cotton has formed on wood surfaces.
  • •Floors have areas of discoloration.
  • •The air in certain areas of the house smells damp and musty.

Despite these indicators, wood rot can still be difficult (if not virtually impossible) for the average homeowner to detect, particularly if it's hiding behind walls, ceiling, or floors. As such, the eventual discovery of damage due to rot can be quite an unpleasant surprise for many. For those planning on selling their home, having a pre-listing home inspection performed by the professionals at Pacific Northwest Inspections, trained to locate signs of rot that might otherwise go unnoticed, can be beneficial in more ways than one come selling time. If rot is uncovered during the inspection, homeowners can, with help of a qualified dry rot repair contractor, have issues fixed BEFORE they're discovered by the buyer. This mitigates the possibility of the transaction being delayed (or nixed altogether!) and ensures that the seller gets full price for their home.

For home BUYERS, a home inspection is even more imperative. The last thing you want is to buy your dream home only to learn later that it's been badly damaged by rot!

Whether buying or selling, it’s always wise to contact Pacific Northwest Inspections and put any questions about the state of your home to rest.


Why you need a home inspection

Most people would often say that a profitable real estate property is highly determined by its location. In reality, though, the key factor which would make someone sign that check is the structural integrity of the property. Careless disregard to the need of a home inspection is like burrowing yourself into a money pit where the bottom is unknown. You owe it to yourself to learn as much as possible about the safety and operability of your home. A home inspection can provide you with an up-to-date visual assessment of the structure and systems of property. The findings are then documented in a detailed report provided by the home inspector. The benefits of a home inspection can be translated to both the seller and buyer of a real estate property.

  • Seller Pre Inspections - A home inspection is a key process in any home purchase and it is not just for buyers anymore. A home inspection will help you determine the current value of your real estate property before putting it up for sale in the market for good. A timely assessment of the physical condition of the property might uncover problems but it could also give light to past renovations which can help boost the value of the property from what you have perceived it to be. You could also come out from that process with recommendations from the home inspector on what areas need preventive repairs and aesthetic improvements. It will enable you to prioritize, whether the repairs are something that you can do yourself or just pass them to the buyer. By staging a home inspection beforehand, you are demonstrating to your potential buyers that you are honest about the condition of your property which brings trust and good faith on the negotiating table. It helps you market your property easier and stress-free. 
  •  Buyer Inspection -  A Home Inspector is that one great guy that you can trust to not have a vested interest in the closing sales of your potential home. Being a smart buyer includes investing in an independent and professional home inspection which provides a layer of protection for you as the prospective homeowner. There would be no more sellers inflating the price of a property. If you do decide to do the home inspection after contract signing, take the time to ensure that the contract has a provision which states that the sale of the home depends on the results of a home inspection. Remember that a mortgage lender may not be able to lend you money for repair costs if you encounter any issues after the sale of the property has been finalized.

Once you have received the home inspection report, you would have the confidence to take the next steps in the purchase process:

  1. For issues needing small or medium repairs, you can either request the seller to fix these issues or you can negotiate for a much lower purchase price of the property.
  2. For repairs that are too expensive to fix, you have the opportunity to walk away from the purchase.

Real Estate Inspections in Seattle

Water Heater Pressure Valve

State of Washington Hot Water Heater TP Relief Valve Requirements

608.5 Relief valves located inside a building shall be provided with a drain, not smaller than the relief valve outlet, of galvanized steel, hard drawn copper piping and fittings, CPVC, or listed relief valve drain tube with fittings which will not reduce the internal bore of the pipe or tubing (straight lengths as opposed to coils) and shall extend from the valve to the outside of the building with the end of the pipe not more than two (2) feet (610 mm) nor less than six (6) inches (152 mm) above the ground or the flood level of the area receiving the discharge and pointing downward. Flex line is not permitted for use on TP lines.

Such drains may terminate at other approved locations. No part of such drain pipe shall be trapped or subject to freezing. The terminal end of the drain pipe shall not be threaded.

Exception: Replacement water heating equipment shall only be required to provide a drain pointing downward from the relief valve to extend between two feet (610 mm) and six inches (152 mm) from the floor. No additional floor drain need be provided.

TPRV Drain TPRV Inspection

Tips for Hiring a Home Improvement Professional


Tips for Hiring a Home Improvement Professional


Whether you’ve decided to put up a fence around the backyard pool or update the guest bathroom, hiring a professional to get the job done can take away a little bit of the stress. However, actually hiring the professional will take a little bit of work on your end.


Get Project Bids


When it comes to hiring a professional, it can be easy to just hire the first person you come across to expedite the process and get the work underway, but it is important to shop around. Just like you shop around at different stores when looking to make a purchase such as a couch or dining room table, it is important to shop around when finding a professional to make sure you are getting the best deal.


Make a goal to obtain three bids or estimates. According to Angies List, by obtaining three bids you will be able to get an idea of the average price range, as well as identify any outliers such as a price that is too high or low. An effective bid should include start and completion dates, payment terms, cost of labor and materials, the cost for permits to be pulled, and proof of licensure or liability insurance if necessary. In addition to getting the bids, meeting with three professionals will give you an idea of their personalities, communication styles, and flexibility. This person will be working in your home for anywhere from a day to a few weeks depending on the extent of the project, so it is important that you feel comfortable with them in your home.


Get a Written Contract


When you hire a professional, consider getting some form of contract in writing to avoid confusion or issues. Technically, a verbal agreement or handshake can serve as a contract, but having everything in writing can ensure that everyone is on the same page and serve as a point of reference when questions come up. No matter how small or large the home project is, having a contract will lessen the likelihood of problems occurring. The Federal Trade Commission (FTC) says a contract should include the following:


Contractor’s name, address, phone, and license number

Estimated start and completion date

Payment schedule

Contractor’s obligation to obtain all required permits

A detailed list of all materials

Information about warranties covering materials and labor

Any promises or special requests made during phone calls, conversations, or via email/text


Keep all documents related to the project in a safe place where they can be easily located should you need to refer to them.


Consider the Type of Price Agreement


When it comes to paying a professional, it is important that the payment schedule is spelled out in your written contract. For small projects, you might consider a fixed-price agreement in which the contractor completes the project for an agreed-upon price. Spend Matters says this type of agreement makes the payment schedule easy to manage, as payments are made based on the percentage of the completed work. It also offers predictability and fosters a greater sense of collaboration with the contractor since he or she is under pressure to protect their margins by using thorough project management communication.


For projects that might run a little longer, you might consider a time and materials agreement in which the contractor determines your cost based upon an hourly rate of labor and cost of materials. This type of agreement is advantageous in situations where the project is fast-tracked since it offers a greater deal of flexibility to change scope, designs, and materials. Ask your contractor for clarification about the different contracts, and understand what limitations each hold. Although you have hired someone, you and your contractor are on the same team so communication is key for an effective home renovation.

There are plenty of reasons to hire a home improvement professional, whether you simply need something fixed or want to increase the value of your home. While there are certainly times when doing it yourself is the cheaper and even more practical option, sometimes you’re just going to need a professional to have the job done well.

Author

Paul is the owner of DadKnowsDIY.com, which shows off helpful DIY projects.


The Gutter System on your Home - Roof


WATER DOESN'T ALWAYS HAVE TO WIN


Proper drainage starts at the Foundation footing. Proper footing drainage prevents water from entering under the building's slab or into the crawlspace. Dry slabs and crawlspaces prevent wood decay and mold issues.


Gutters are a very important part of your roofing system and will require regular maintenance to keep your home/building operating properly. By directing rainwater away from the perimeter of your home, gutters are the first line of defense against water seeping into your home's siding, foundation, and soffits. Water-damaged building materials often lead to interior mold, wood decay, and wood-destroying insects. So if your gutters are clogged with debris or are not in an operating condition, they will not function properly, potentially resulting in water damage to your home/building among other things.


Gutter Debris - This is the easy step, keep your gutter clean! It takes very little debris to back up a gutter drainage system. While inspecting your gutters ANY debris near the scupper needs to be removed no matter how small the amount. Gutter Seams - Seams will need service every few years for failed caulking. These areas are easily inspected during rainy days. Walk the property and look for excessive dripping along gutter ends, especially outside corners and inside corners. Any troubled areas will need old caulking cleaned/removed and sealed with a 50-year gutter sealant. Loose Gutters - Older gutter systems were installed with gutter nail spikes. These fasteners over time lose holding power and often need to be replaced with new-style screw hangers. Screw hangers are easier to install and are unlikely to slip the rafter tail like the nail spikes are known to do. Hanger should be installed every 2-3 feet. Also, Remember not to interfere with the pitch of the gutter when installing your new hangers.


Leaks from behind the Gutter
There’s a small kickout at the bottom of the vertical fascia leg of the drip-edge. Ideally, any water that makes its way along the drip-edge will hit that little kickout and be diverted safely into the gutter. Water that does find its way behind the gutter and drip down the fascia can cause problems if the fascia is not properly weather sealed.
 
Having the shingles nearly flush with the drip-edge should not be a problem. The amount that shingles overhang the drip-edge should comply with the shingle manufacturer’s recommendations. The Residential Asphalt Roofing Manual from ARMA (Asphalt Roofing Manufacturers Association) says that asphalt shingles may be cut flush with the drip-edge or extend 1/2 inch to 3/4 inch beyond the edge of the roof. Another factor in determining the overhang is whether strong winds are a problem in your area. If the house is in a high-wind zone, I would not let the shingles overhang more than 1/4 inch, to minimize the chance of them lifting up during a storm.Check first to see if the kick-out portion of the drip edge extends over the back edge of the gutter. If the gutter is mounted too far below the drip edge, or if the kick-out doesn’t extend far enough over the gutter, a retrofit solution would be to slip a strip of metal or rigid plastic flashing under the vertical fascia leg of the drip edge and let the bottom edge of the strip overlap the back edge of the gutter. The success of this strategy depends on the shape of the gutter and the type of hangers. If the hangers are in the way, I’d insert the strips between the hangers.

Then, when the time comes to replace the shingles, a new drip edge should be installed—one that has a fascia leg with a big enough kick out along the bottom edge to channel water directly into the gutter

Where Does The Water Go?

It’s a well-accepted fact that excess rainwater near the foundation of a home is an invitation to water in the crawlspace. For example, homes have rain gutter systems to collect and channel rainwater off the roof into a downspout instead of simply allowing it to pour over the edge where it will saturate the soil in the 12-foot zone around the home and ultimately end up seeping through the foundation. Most homeowners get this and keep their gutters clean and flowing. But wait!!! there’s the downspout. The downspout is the pipe that takes the water from the gutters and conveys it to the ground. If, however, the downspout is nothing but a straight pipe, with perhaps a short elbow attached, that ends at or above ground level, the whole thing is useless because the water is still being dumped around the foundation, this time in concentrated spots, and the basement is destined to leak. Again, most homeowners get the concept but, regrettably, many of them seem to think that, as long as their downspout disappears into a pipe or the ground, all is well. Too many times, however, what appears to be a functioning downspout extension turns out to be the “pipe to nowhere.”

The pipe to nowhere comes in several disguises but they all have one thing in common – they create a concentration of stormwater on or in the ground around the foundation of a home and cause the basement to seep water through any one (or more) of a variety of openings.

One local Seattle owner with a solid poured concrete foundation, for example, had downspouts running into professionally-installed PVC pipes that led into the ground. When these “extensions” were dug up, they turned out to be straight lengths of pipe that extended 2 feet into the soil and stopped. They went literally nowhere but caused the soil to be oversaturated and standing water in the crawlspace.

Then there’s the “looks good on paper” pipe to nowhere that is an underground extension but is so poorly planned and designed that it does more harm than good.

Another local Bellevue homeowner had underground extensions installed using the kind of corrugated plastic pipe (which is not the best system, Use Schedule 40 PVC drainage pipe!) that is normally used for interior drain tile. This pipe is perforated and the idea behind the design was that water would flow through the perforations and be absorbed by the soil. This might have worked for a short time when only a trickle entered the pipe but it was completely buried, causing it to clog up with soil, and the first heavy rain backed up the extensions and overflowed back under the house.

Finally, there’s the “it’s connected to what?” version of the pipe to nowhere that is often found in older homes. Chances are, when downspouts empty into corrugated piping that extends out of the ground, this pipe is connected to the home’s exterior drain tile system. This may work OK but it can create other maintenance problems.

When the water from the downspout flows into the drain tile system, it multiplies several times over the volume of water the drain tile was designed to handle. This greater volume of water creates a huge load on the sump pump, which will run almost continuously in heavy rains, shortening its life and increasing the risk of failure. There are much easier and less costly ways of extending a downspout and preserving the sump pump.

So how does a homeowner avoid the dreaded “pipe to nowhere?”  By having a qualified drainage specialist design and install an underground downspout extension system that goes to the right place – a bubbler pot, dry well or storm sewer – and that will keep rainwater away from the foundation and out of the crawlspace.

Corrugated Drainage Vs Schedule 40 Piping

Black corrugated drain piping is not the ideal choice. It is difficult to inspect and future cleaning may not be possible, which leads to replacing the entire buried system.

Sellers Disclosure Form 17 Vs. Home Inspection SOP

FORM 17 and what the Buyer needs to know.

Form 17 is a state-mandated form, and the seller only has three options: Yes, No, and Don’t Know.

If a seller answers “Yes” to any question, they have just guaranteed that the answer is an absolute yes, which is the same in the law as an insurance policy on which you could sue them if the answer turned out not to be 100% true. If they answer “No” and the real answer is anything less than 100% no, again they could be sued.

If they answer “Don’t Know” they are answering with the safest answer, but it may also be the most truthful answer. After all who knows that a particular condition of the house is either 100% yes or 100% no? Who would be willing to be sued if they were even slightly incorrect?

When a person answers “Don’t Know” they reduce the possibility of being sued almost completely. Part of the reason is that it may be the most truthful answer, but even more importantly it would be very difficult to come up with actual evidence you could use in a courtroom under the strict Federal or State Rules of Evidence that they knew inside their head. Unless there is external evidence, there is virtually no way to prove that someone knew or didn’t know inside their own mind.

Form 17 Vs. WA State Home Inspection SOP

Form 17 Issues

Understanding what a Home Inspection covers when you should turn to Form 17 to get the answers that a Home Inspection doesn't include, based on the Washington State SOP for home inspections.

Take a look at the image to the right, we have highlighted all the areas that pertain to the limitations of a home inspection based on the WA State Standards of Practice and what a Home Inspector is required to look at under the licensed inspector's required visual inspection. (Our review of Form 17 does not suggest that areas not highlighted be ignored. The entire form should be reviewed by your Realestate lawyer prior to the signing of any legal document)


Follow along with us as we break down the highlighted areas in the Sellers Disclosure Form 17 

Section 1. TITLE

Inspectors are not required to report on any easements, property lines, right of way, zoning, etc. WAC 308-408C-030 This section is what your Title Company typically verifies.

Section 2. WATER

A (1) Private Water Systems - Inspector is not required to inspect: WAC 308-408C-100 (vi) Private water supply systems. ( Yes this is outside the scope of the WA requirements. Make sure you understand what is being inspected when buying a home with a private water supply system. Many inspectors will follow the State SOP due to insurance policy requirements)

A (2) Is there an easement for access and/or maintenance of the water source?  - This area is also outside the standards for a home inspection. Home inspectors do not verify access rights or maintenance responsibilities of the home's water source. WAC 308-408C-100 This applies to both public and private source and water wells.

A (5) Are there any water treatment systems on the property? - The inspector is not required to inspect: WAC 308-408C-100 (v) Water-conditioning equipment, including softeners and filter systems. 
 

B. Irrigation Water

(1) Irrigation water rights, permits, certifications, or claims? Inspectors are not required to inspect. Believe it was a few years back we did an inspection where the water service was coming from a stream along the back of the property. The home had very low pressure and was later determined that yes the home was served by the stream. So what would happen if neighboring properties cut off the stream? Is it your right to have the stream returned to its natural flow? What if flow changes? So just when you have been spoiled by public utilities it is up to the buyer to verify such cases. Think this was a Renton property if I recall...

C. Outdoor Sprinkler System

C (1) Outdoor Sprinklers - Inspectors are not required to inspect. (12) Determine the existence of or inspect any underground items including, but not limited to, underground storage tanks or sprinkler systems.

Section 4. STRUCTURAL

F. Defects

Some of the defects listed for the seller to check are items a Home Inspection itself is not required to inspect. Some of these items are:

Pools

Stair Chair Lifts

Hot Tub

Elevators

Wheelchair Lifts

Fire Alarms

Sauna

Outbuildings

Incline Elevators

G. Structural Pest

Structural Pest inspections are not permitted by Home Inspectors unless they are licensed Structural Pest inspectors. SPI inspection is not required and is often omitted from a Home Inspection.

Section 5. SYSTEMS AND FIXTURES


Section 7. ENVIRONMENTAL

EVERY ITEM IN THIS SECTION IS NOT A REPORTED REQUIREMENT OF A HOME INSPECTION

A home inspection does not report on Environmental issues.

Inspectors are not required to: (3) Report the presence of potentially hazardous plants or animals including, but not limited to, wood-destroying insects or diseases harmful to humans; the presence of any environmental hazards including, but not limited to mold, toxins, carcinogens, noise, and contaminants in soil, water or air; the effectiveness of any system installed or methods utilized to control or remove suspected hazardous substances.

The Home Inspection does not include investigation of mold, asbestos, lead paint, water, soil, air quality, or other environmental issues unless agreed to in writing in the preinspection agreement.


Stay tuned for more....Yes, we are just getting started.


We reached out to Dana Charter to help better inform our clients about Form 17 so he created this great Youtube video. Check out this video from Dana Charter with John L Scott of Issaquah as he explains the Form 17 Sellers Disclosure Form THANKS DANA!

Inspection Services

Pacific Northwest Inspections Group provides property inspections services for Residential and Commercial property in the State of Washington.


  • AHERA Inspections - Asbestos Hazard Emergency Response Act
  • All Phase Inspections
  • Certified Mold Inspections
  • Radon
  • EIFS Inspections
  • Water Test
  • Sewer Line Inspection Inline Camera (also leak detection wax ring failure)
  • Condo Property Condition Inspections
  • Condo Reserve Study Program 
  • Septic Inspections Level I and II
  • Well Inspections
  • Asbestos Testing 
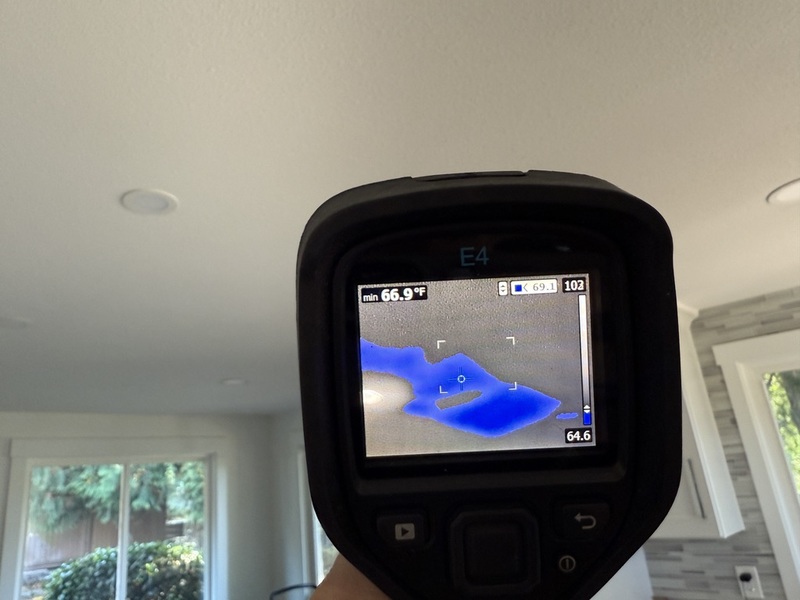
  • Thermal Image Inspections
  • Roof
  • EMF Inspections (Electro Magnetic Fields)
  • IAQ (Indoor Air Quality) Inspection 
  • VOC Air Testing
  • Formaldehyde Air Testing
  • Pool Inspection / Water Testing
  • Insurance
  • Perform ASTM F2170 relative humidity test
  • Soil Testing 
  • Lead Testing (Soil / Paint) 
  • Energy Audit Inspections
  • LEED Rater
  • Energy Star Home Verifier
  • Tax Rebates
  • EEM - Energy Efficient Mortgage
  • HERS & ResNet
  • Pre Sale Inspections
  • Historical Home Inspectors
  • Property Maintenance Inspection Program 
  • Termite - SPI Licensed Structural Pest Inspector
  • EH&S Inspections
  • Home Warranty Inspections
  • FHA Inspections
  • Granite Radiation Inspections  
  • Crawlspace / Attic / Basement - Mold Condition Monitoring   Systems      
  • Ozone Treatment   
  • Ozone Air Sampling   
  • Manufactured Home Inspection
  • Structural Engineer Reports                                           
          

Inspection features:

  • Leading  Technology in testing equipment
  • Fully Insured Company
  • Reports Online within 24hrs of inspection
  • All Inspectors are Certified
  • State Licensed Inspectors
  • Coverage of entire Northwest
  • Onsite Video Embedded Within Inspection Report

Extensive Inspector Training:

  • Certified Mold Inspectors
  • Leading Technology
  • True onhands training that make the difference
  • Licensed Inspectors
  • Full Time Inspectors
  • Certified Pool/Spa Operator
  • Thermal Image Training
  • State Licensed WDI / SPI Specialist
  • Certified Radon Inspectors
  • Members of National Association of Certified Home Inspectors
  • Certified Home Property Inspectors
  • Asbestos Inspectors
  • Lead Risk Assessors


Garage Door Maintenance

The following tests and related maintenance should be performed in the following order:

  • Monthly visual inspection. Stand inside the garage with the overhead garage door closed. Look over the garage door springs, cables, rollers, pulleys and mounting hardware, such as hinges, for signs of wear or damage. Look for cable wear or fraying. Is the mounting hardware becoming loose? If something doesn’t look quite right or sounds excessively loud it could be the symptom of a more serious issue. Have your garage door system inspected by one of our trained home inspectors.
  •  
  • Monthly door balance test. If your door is equipped with an automatic opener system: close the door and disconnect the automatic opener at the door arm, this is typically a string with a red handle. Lift the door, It should lift easily with one hand smoothly with little resistance and should remain open when halfway up. If it is difficult to open or does not remain open, the door is likely out of balance and should be serviced.
  •  
  • Monthly reversing mechanism test (if your door is equipped with an automatic opener system). Note: garage door openers manufactured after January 1, 1993, are required by federal law to be equipped with a reversing mechanism and a photo eye or edge sensor as added measures of safety to prevent entrapment. If your system does not have these features, the replacement of your automatic operating system is recommended, especially if you have children in the home.
  •  
  • With the door fully open, lay a piece of wood such as a section of a 2 x 4 on the floor in the center of the garage door opening where the door touches the floor. Push your garage door opener’s transmitter or wall button to close the door. When the door strikes the wood, the door should automatically reverse. If the door does not automatically reverse, the door should be serviced for auto-reverse function.
  •  
  • With the door fully open, push your garage door opener’s transmitter or wall button to close the door. Wave an object, such as a broom, in front of one of the door’s photo eyes so it “breaks the beam.” The door should instantly reverse.
  • If it does not reverse and reopen, pull the broomstick out of the path of the closing door. Close the door. With the door in the closed position, clean the photo eyes with a soft, dry cloth. Gently adjust the photo eyes by hand until the sensor's lights turn green.
  •  
  • Open the door and repeat the photo eye test. If the door does not reverse and reopen, the door should be serviced.
  •  
  • Semi-annual lubrication. Apply a small amount of spray lubricant to the door’s hinges, rollers, and tracks. Yes, it is a DIY job.


Check out what our friends at Centurion Doors have to say about garage door maintenance.....